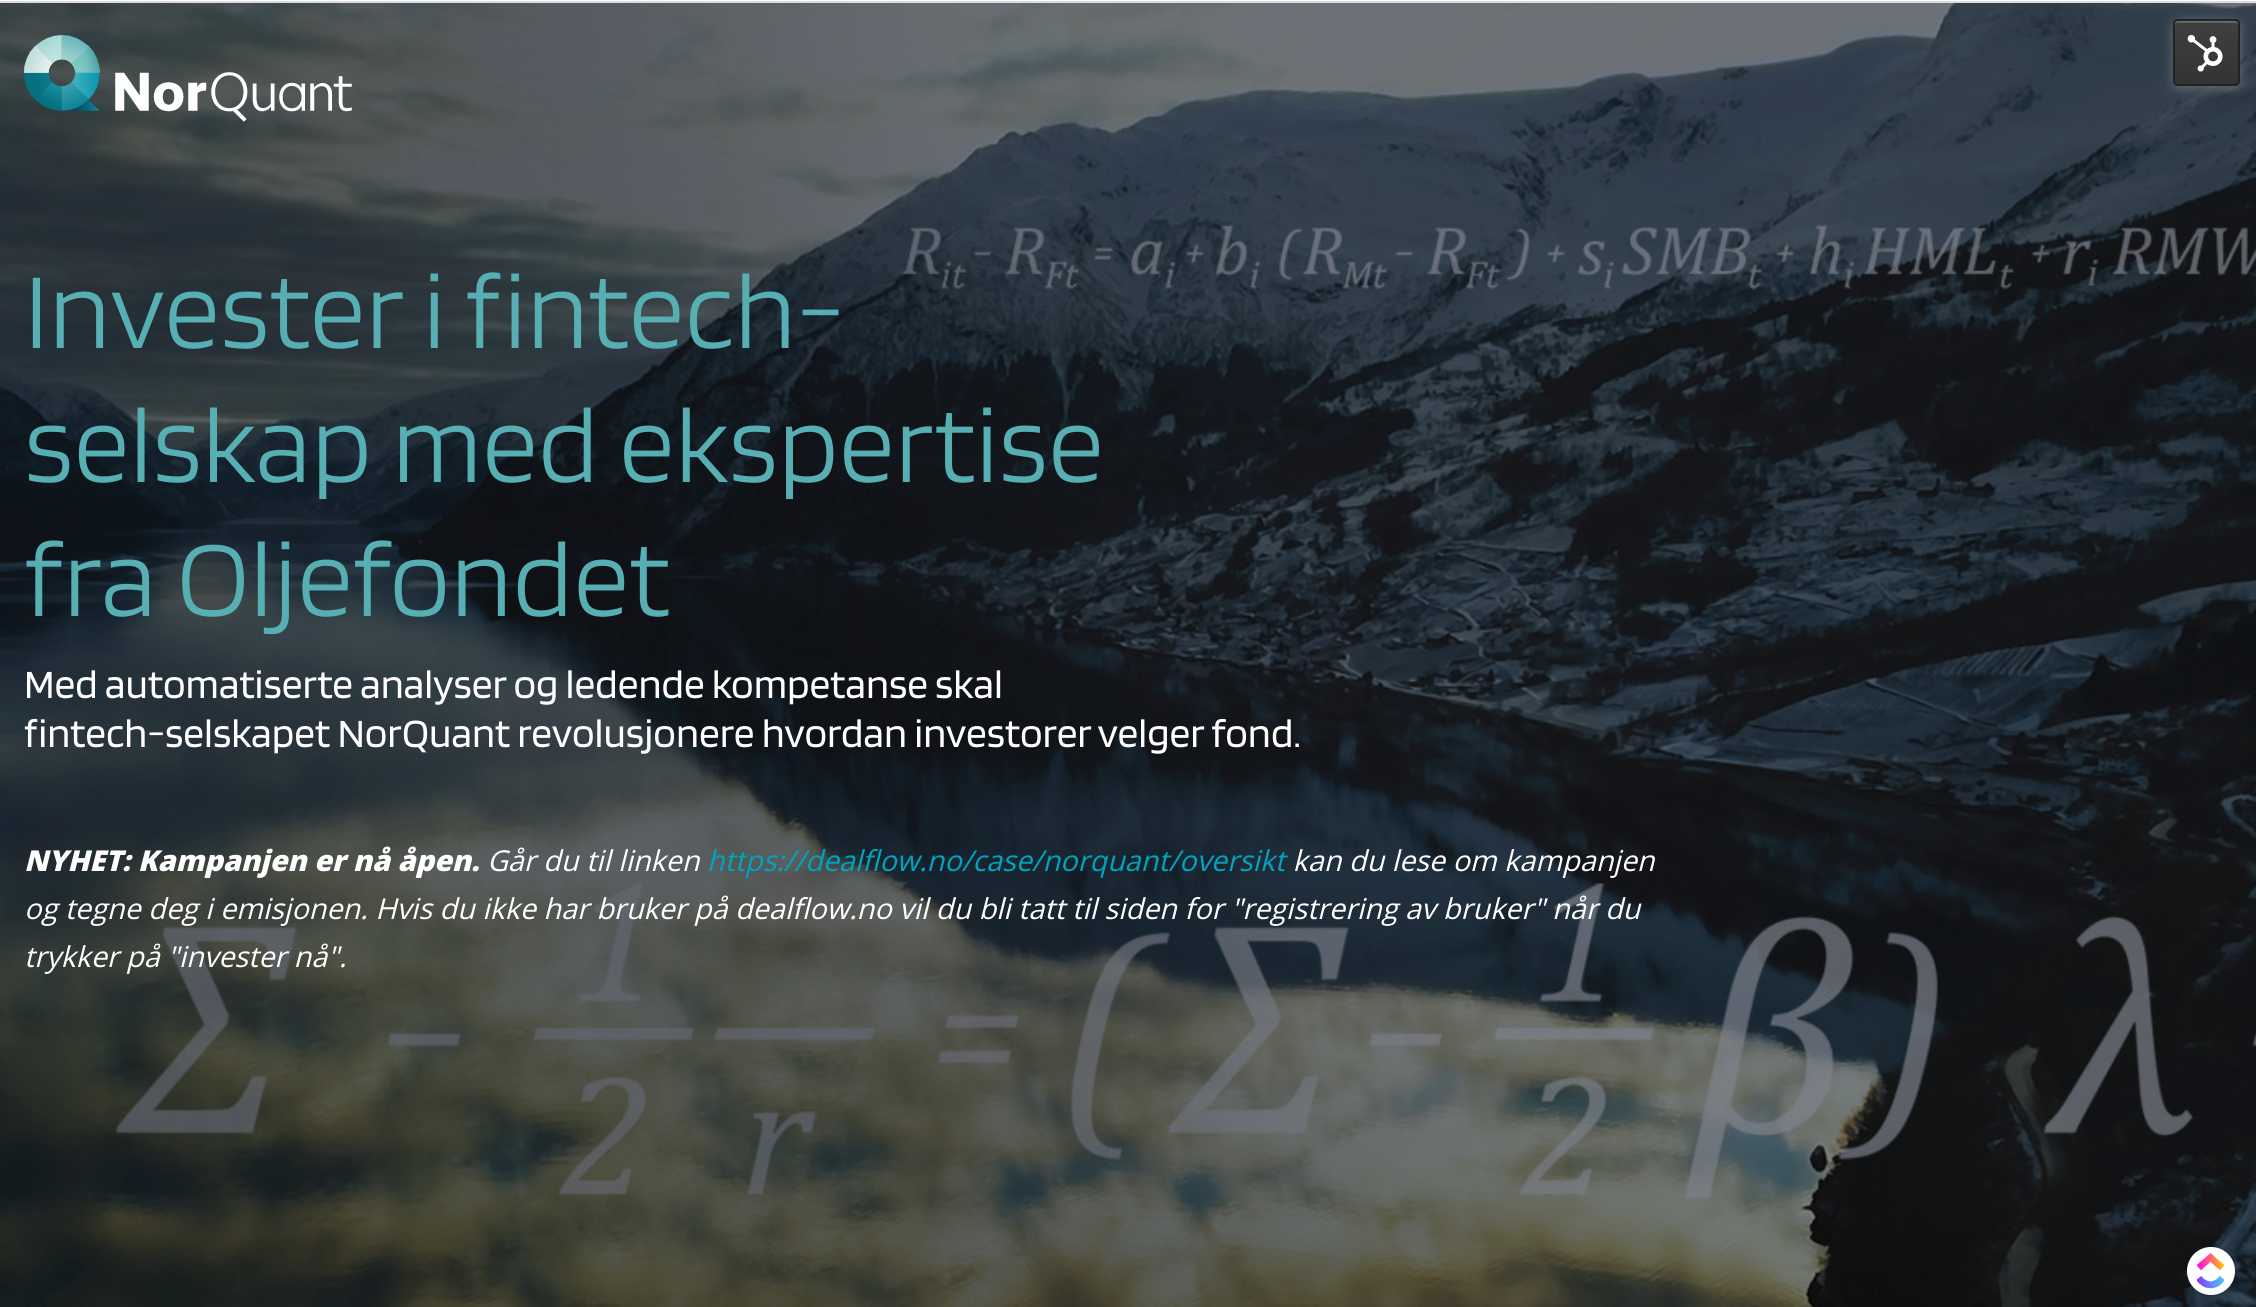
How NorQuant went beyond their crowdfunding target in just 7 days.
What is this tutorial about?
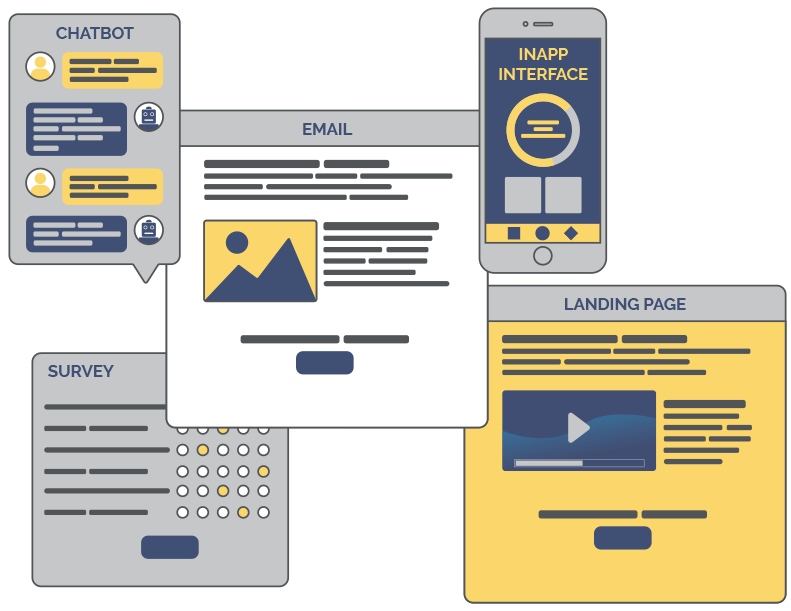
In this article we will show how you can use HubSpot, both for CRM, lead forms and email automation, in a fundraising campaign. While the purpose was fundraising, all of the techniques can be used for sales between real humans - with some automation making it much easier to handle.
Here's what we'll cover:
- Set up of a lead generation form on a landing page. Add your own custom contact property to let leads register how much they intend to invest.
- The essential part here is that we want the contact info plus an investment hint, and in return the user gets the investor presentation as a handy PDF in their inbox.
- Set up a dynamic list and sort leads by the most promising ones using custom properties.
- This way the CEO and COO of NorQuant has an easy to view list of who their investor leads are, how much they want to invest and they can see how the list is growing as they keep inviting new leads to the landing page.
- Automatically add these leads to a sales pipeline in the CRM so that the right person can follow up the leads personally.
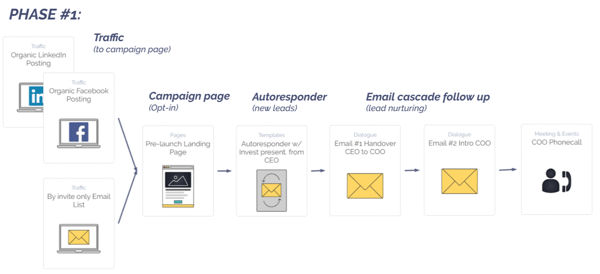
- This is the crucial link between the marketing campaign, generating digital leads, and the work that management does to ensure they actually follow up on the leads through to signing the deals.
- Send personal follow up emails automatically to keep the leads warm in the immediate days following their registration.
- With a large list of leads it is nearly impossible to write personal follow up emails in time. The set-up of automatic follow up emails were timed to keep the leads warm in the crucial time just after they've registered:
- Email #1 (Immediately after signup): An email from CEO Thomas with the PDF investor presentation.
- Email #2 (1 day delay from signup): A follow up email from Thomas introducing the COO who will be the one in dialogue with important leads.
- Email #3 (2 hour delay after previous): An email with the COO introducing himself and inviting the user to talk to him, preparing them that he might be in contact again (via regular email later).
- With a large list of leads it is nearly impossible to write personal follow up emails in time. The set-up of automatic follow up emails were timed to keep the leads warm in the crucial time just after they've registered:
About NorQuant
NorQuant has developed software that automates processes related to factor-based management and portfolio composition. The company also develops software for quantitative analysis and robo-advisory.
NorQuant assists family offices and other investment firms in achieving their investment goals. Based on requirements and desires, we helped develop, implement and execute a professional, research-based and transparent strategy.
For a more detailed explaination please watch this 3 minute video we made for the campaign, with CEO Thomas Nygaard.
“Without a doubt, Coupler played a key part in our campaign's success. The way they set up web pages and emails, along with excellent storytelling both in video and texts has been a great help. I’ve used LinkedIn extensively in this campaign, and Coupler’s efforts have helped me communicate effectively with my personal connections there” says Thomas Nygaard CEO of NorQuant.
The Reasoning behind the campaign
NorQuant is, through the crowdfunding plattform Dealflow, seeking investors for funding the next step in development and commercialisation of their services. Dealflow has a database of 15 000 investors already signed up. This was an important audience for NorQuant to tap into, both to convert them into active leads and to generate a list of potential investors. Therefore, we set up an exclusive pre-launch campaign for the Dealflow database prior to the official launch so we could start collecting leads and gather interest prior to the official launch and crowdfunding sign-on.
The campaign was planned in two phases:
- Phase 1: Pre-launch - by invitation only (two weeks prior)
- Phase 2: Post-launch - open for public
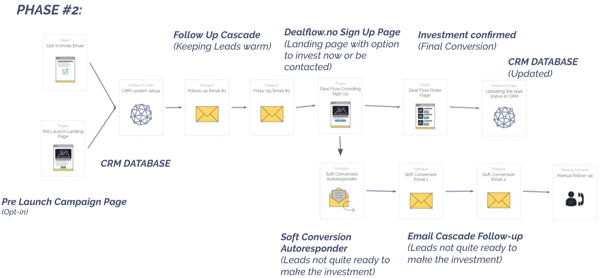
Elements that were created for the campaign:
- Custom campaign page
- Video content
- Custom registration forms and flows
- A deal pipeline
- A custom workflow
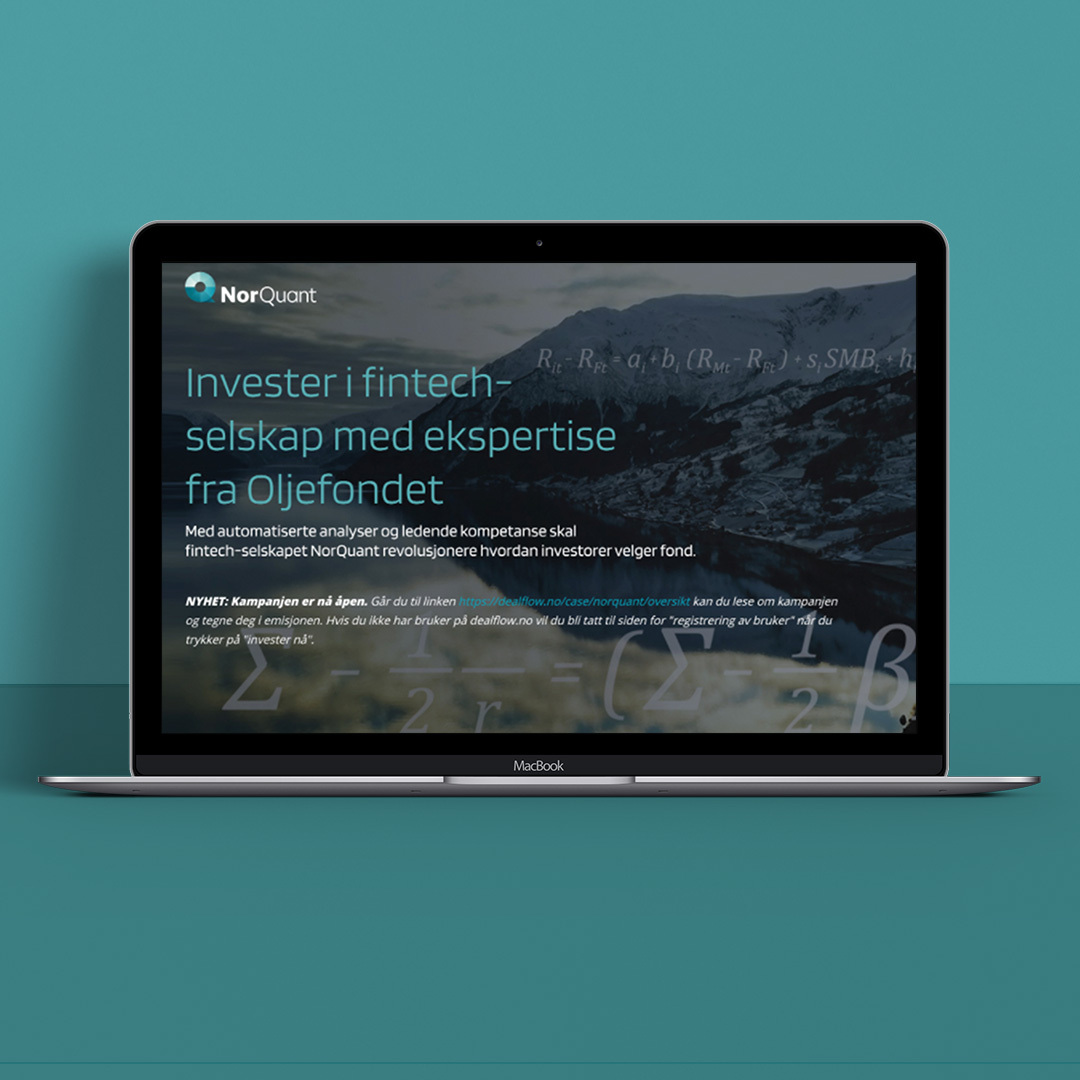
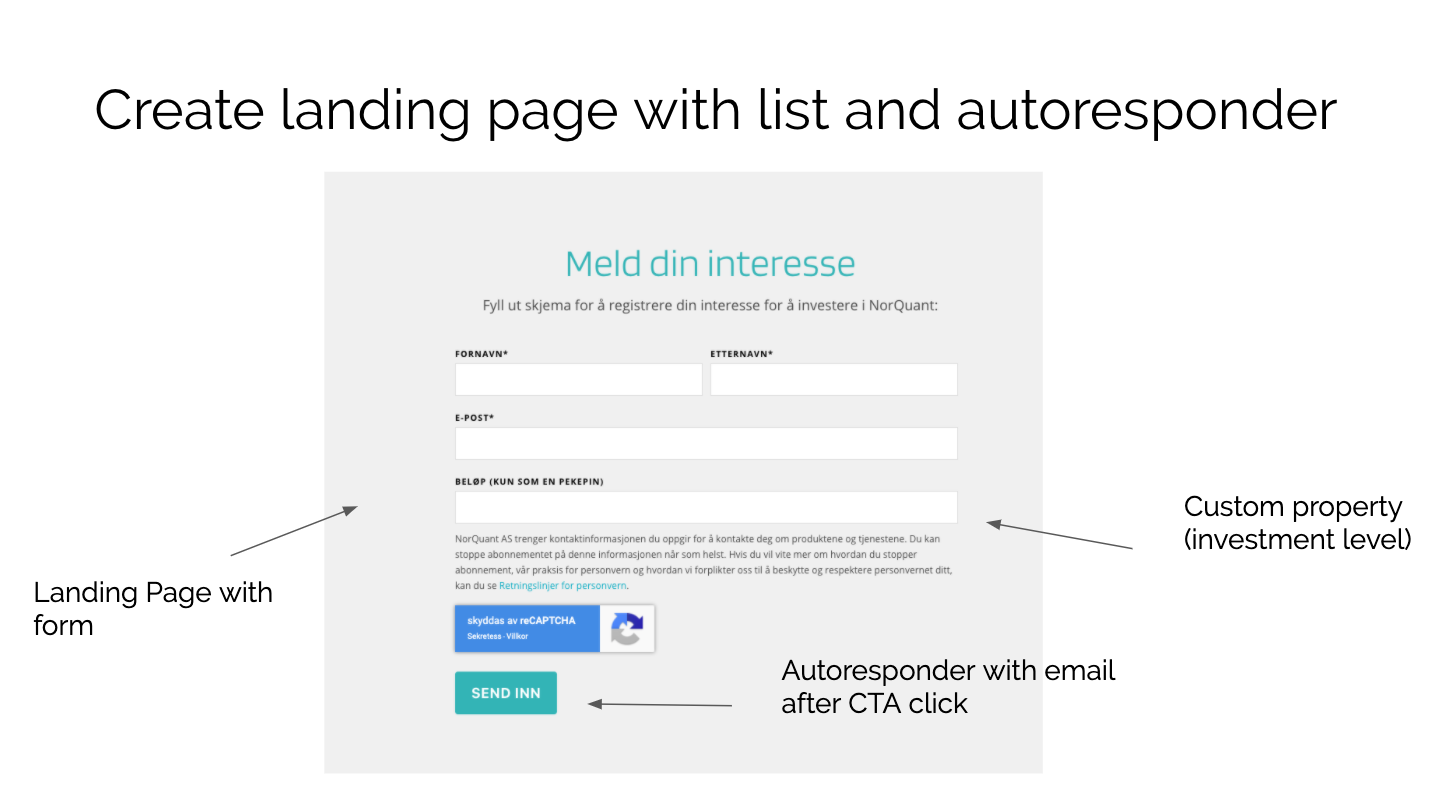
STEP 1: The Campaign page with an Autoresponder
Creating a landing page with a simple value propostion, was the first element of this campaign.
A minimum content requirment was a short presentation of the company and team, the unique value proposition of NorQuant, convicing arguments for why you should invest, with clear CTAs (call-to-actions/buttons) and adding social proof by referencing one of NorQuant and Norway's most predominant investors.
1. create the landing page
- In your HubSpot account, navigate to Marketing > Website > Landing Pages
- Then select create landing page in the right corner.
2. Create the Form for landing page
Forms allow you to collect information in dedicated fields and decide which fields need to be mandatory vs optional. Forms have a big impact on your business as they indirectly help you establish a relationship with clients.
How to create a form for a Landing Page
- Navigate to Marketing > Lead capture > Forms.
- Select Create form and choose form type.
Create landingpage and connect to list and autoresponder:
3. Insert form to Landing Page
- Navigate to Landing Pages and select the one you want to insert the form to.
- In the left sidebar select “Edit” Column 1.
- Then choose to fill in “Add form below”.
- And choose "Select form" below.
4. Connect Autoresponder to the landing page
When you have finished the landing page it's time to create an autoresponder to the form. An autoresponder is trigger-based email or message that you send out automatically after a visitor signs up to your email list.
There are a several ways to create autoresponders, with the NorQuant case we solved it as follows:
- Navigate to Marketing > Lead capture > Forms
- Select Create form
- Choose between regular form or Pop-up form and click Next
- Select one template you prefer and Start
- In the upper main menu navigate to Follow-up
- Select Create follow-up email
STEP 2: Organise Your Contacts
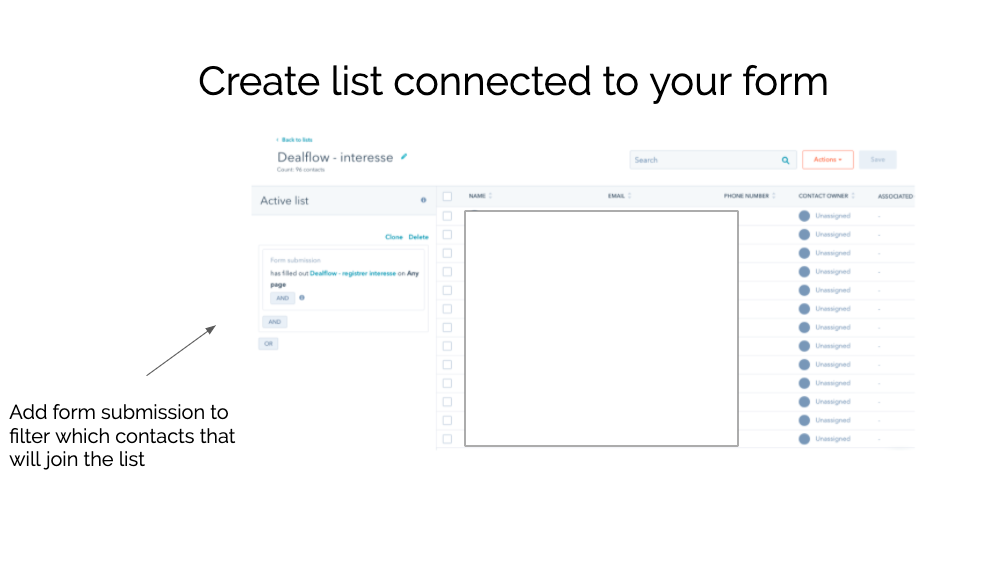
Naturally, once we have the elements ready for start capturing the willing investors, we need to organise the leads that have signed up. Lists are a great way to categorize your contacts.
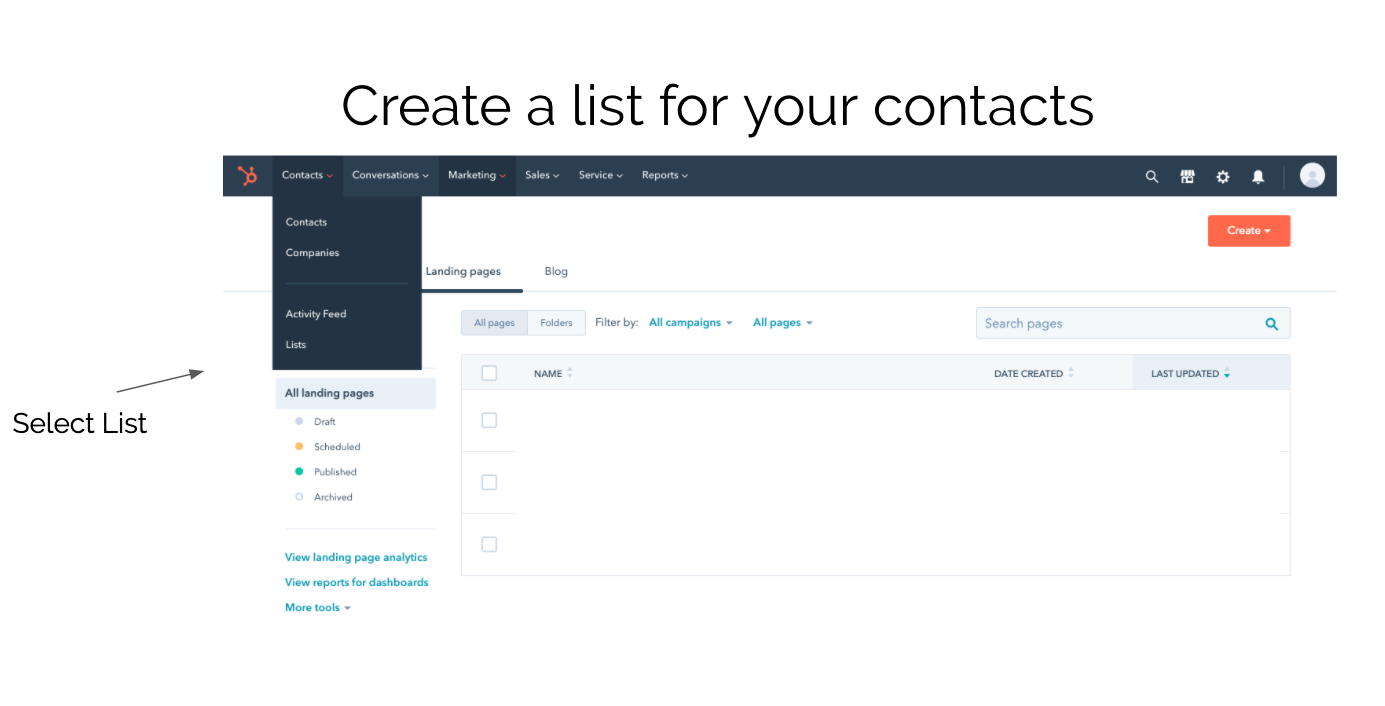
1. To create a list
- In your HubSpot account, navigate to Contacts > Lists.
- Click Create list
- To choose which types of contacts you want to select in the list, add a filter. There are several filters to choose between, for example it's possible to filter your contacts after Company properties and select what type of company information the list should filter contacts by.
2. Collect and Categorize according to Valuable Data
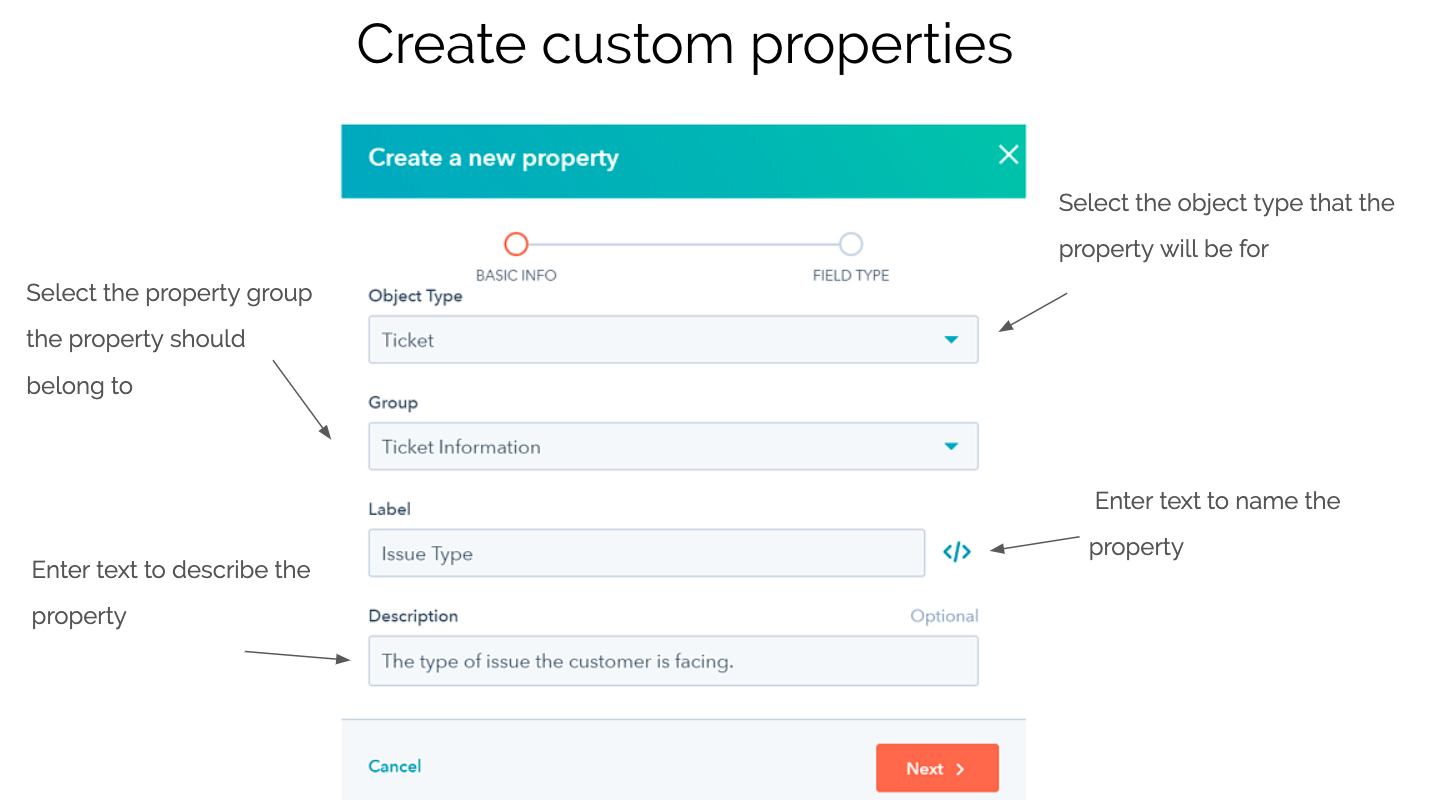
Reminding that the purpose of the campaign was collecting potential investors. It would be interesting knowing what money they are looking to invest. Thus, we add a custom proporty of the contacts with the optional information about Investment Levels.
Properties are used to store data on certain objects in HubSpot, such as contacts, companies, deals, tickets, and products.
Hubspot CRM stores data on certain objects in properties, such as contacts, companies, deals, tickets, and products. Some describe them as fields. The CRM comes with several standard properties to get you started (e.g. phone number, city), but you can create custom properties that are more relevant for your business. For example, NorQuant has created Investment levels as a custom property and an optional value to add in the forms.
How to create custom properties:
- In your HubSpot account, click on the settings icon in the main navigation bar.
- In the left sidebar menu, navigate to Properties.
- In the upper right, click Create property.
- In the right panel, set up your property:
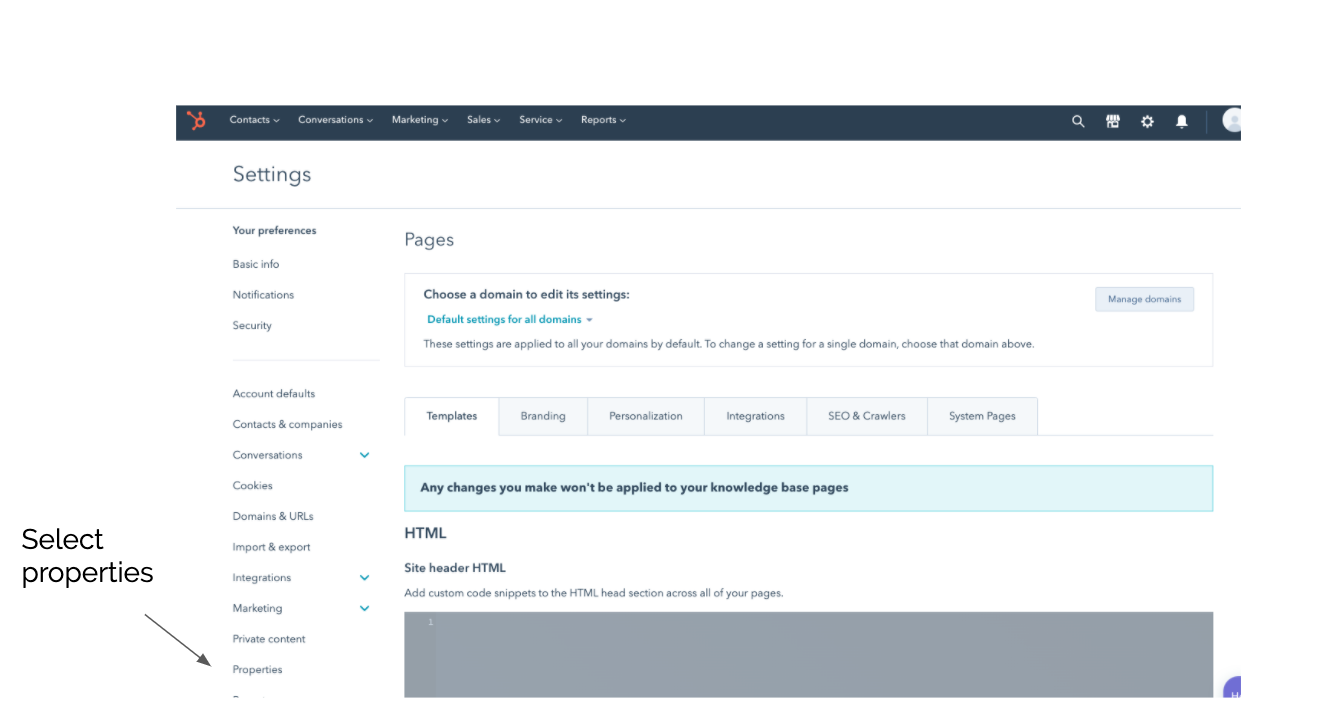
- Object type: select the object type that the property will be for.
- Group: select the property group the property should belong to.
- Label: enter text to name the property.
- Description: enter text to describe the property
- Click Next.
STEP3: creating A Fundraising Pipeline
With a small teamat NorQuant, alignement of the team is normally simple and easy. Nevertheless, being two persons primarily responsible for sales, shared responsibility also means shared accountability.
Set up and customize your deal pipelines and deal stages
Deal pipelines can be used to predict revenue and identify roadblocks in your selling process. Deal stages are the steps in your pipeline that identifies to your sales team that an opportunity is moving toward the point of closing. Keeping track of your deals progress in your deal pipeline gives you a more detailed picture of your projected revenue for a given time. Deal pipelines visually depict deals in various stages of the sales pipeline along with the ability to drill into each deal to gather more details.
Better visibilitity into the pipeline means deals get the attention they deserve and can close at a higher rate. Furthermore, it´s a benefit for the whole team to get access to see an overview of the prospects in the pipeline. It's primarily, a great way for the Sales Manager to keep track of the other in the team, to ensure that the company achieves the expected sales goals.
1. How to create a deal pipeline
- In your HubSpot account, click the settings icon settings in the main navigation bar.
- In the left sidebar menu, navigate to Sales > Deals.
- In the Deal Pipelines and Stages section, you can view and edit the structure of your current pipelines or create a new pipeline.
- To create a new pipeline, click + Add another pipeline.
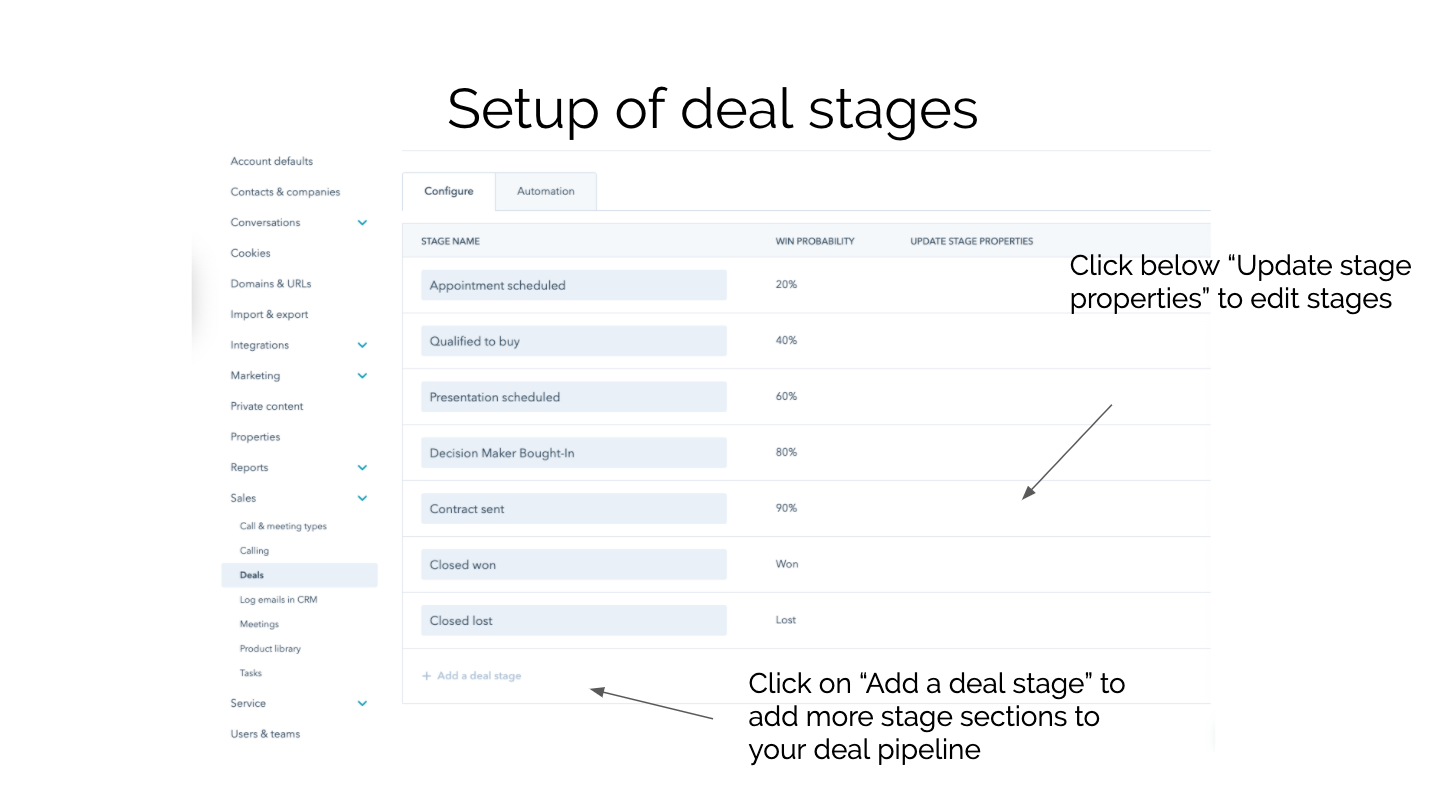
With HubSpot Professional you can even make several Deal pipelines.
2. Setup of a deal workflow
Coupler created two different Workflows for the NorQuant campaign with different purposes. One with the purpose to automatically add new leads to a sales pipeline in the CRM so the right people can follow up leads personally. The second Workflow was made to automatically write personal follow up emails in time to a large list of leads. The Workflow was aimed to send follow up emails that were timed to keep leads warm after they were registered.
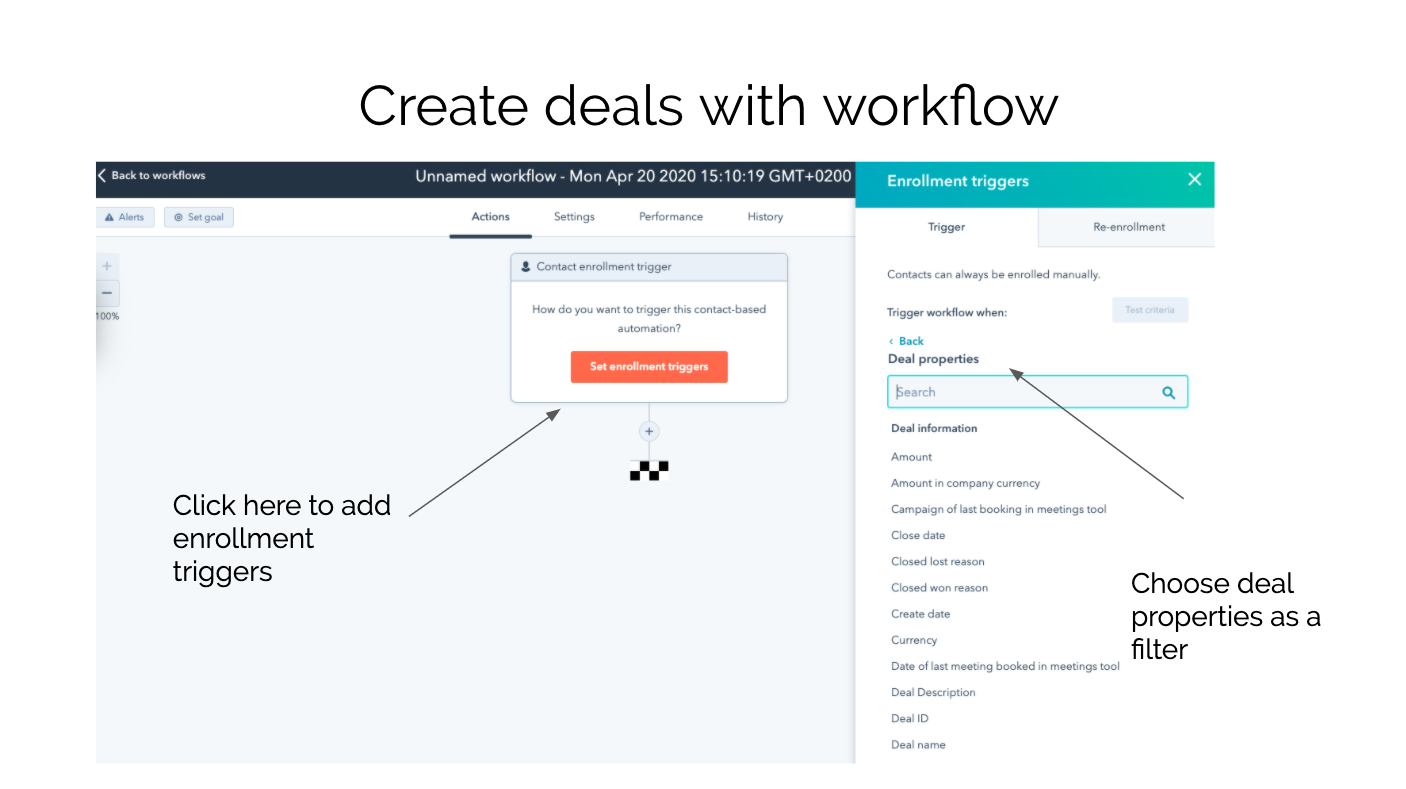
Create deals with workflow
Use a workflow to automate the process of creating a new deal in HubSpot and reduce administrative processes for sales representatives.
- In your HubSpot account, navigate to Automation > Workflows.
- Click the name of an existing workflow, or create a new deal based workflow.
- Click next.
- Select Set enrollment triggers.
- Choose filter type Deal and select deal information.

STEP 4: automation of emails
The main purpose of automating all your emails is to avoid having to send out each e-mail manually and scale down on the repetitive tasks. The automatic email sending is called “trigger email” which means that an email is sent automatically because it was triggered by an activity at a given time. In the NorQuant case, the activity that triggered the email was when visitors to the website filled in the form. In this case the form worked as a trigger for the autoresponder. Another advantages of automating email sending is that it makes it easier to send personalized messages at the right time. In the NorQuant case they have focused on sending out personalized emails to make it look like it´s sent from their own, private emails.
To start automating your emails with workflows you need to create and save the email for automation first.
1. Create automated emails to use in workflows
You can create an automated email using either the regular email editor or the drag and drop editor. We will show you how you do it in the regular editor.
How to create automated emails:
- In your HubSpot account, navigate to Marketing > Email.
- In the upper right, click Create email.
- In the dialog box, select Automated.
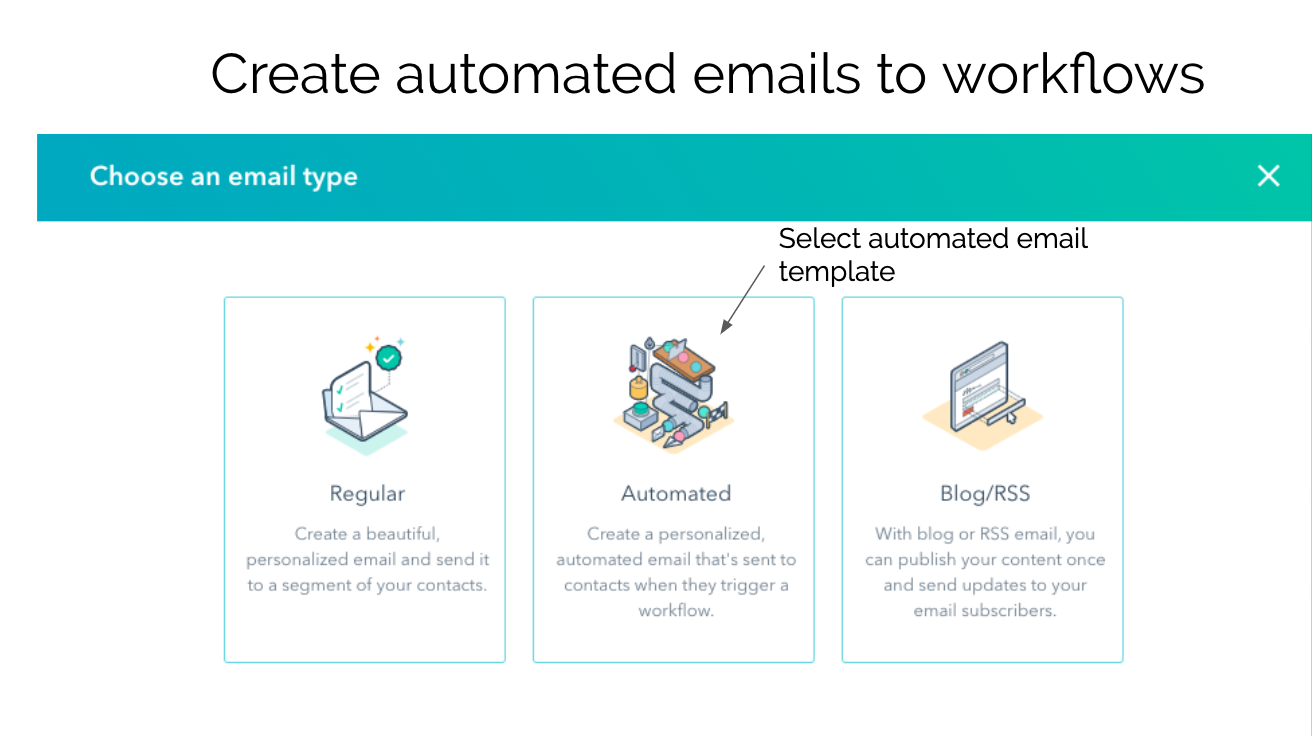
- Select a template.
- In the dialog box, enter an Email name and click Create email.
- In the upper right, click Save for automation to publish the automated email.
Once the automated email is published, it will be available for selection in the Send email action in workflows.
2. Start building the workflow when you have finished your emails
- In your HubSpot account, navigate to Automation > Workflows.
- In the upper right, click Create workflow.
- In the left panel, choose whether you want to start your workflow from scratch, or from a template.
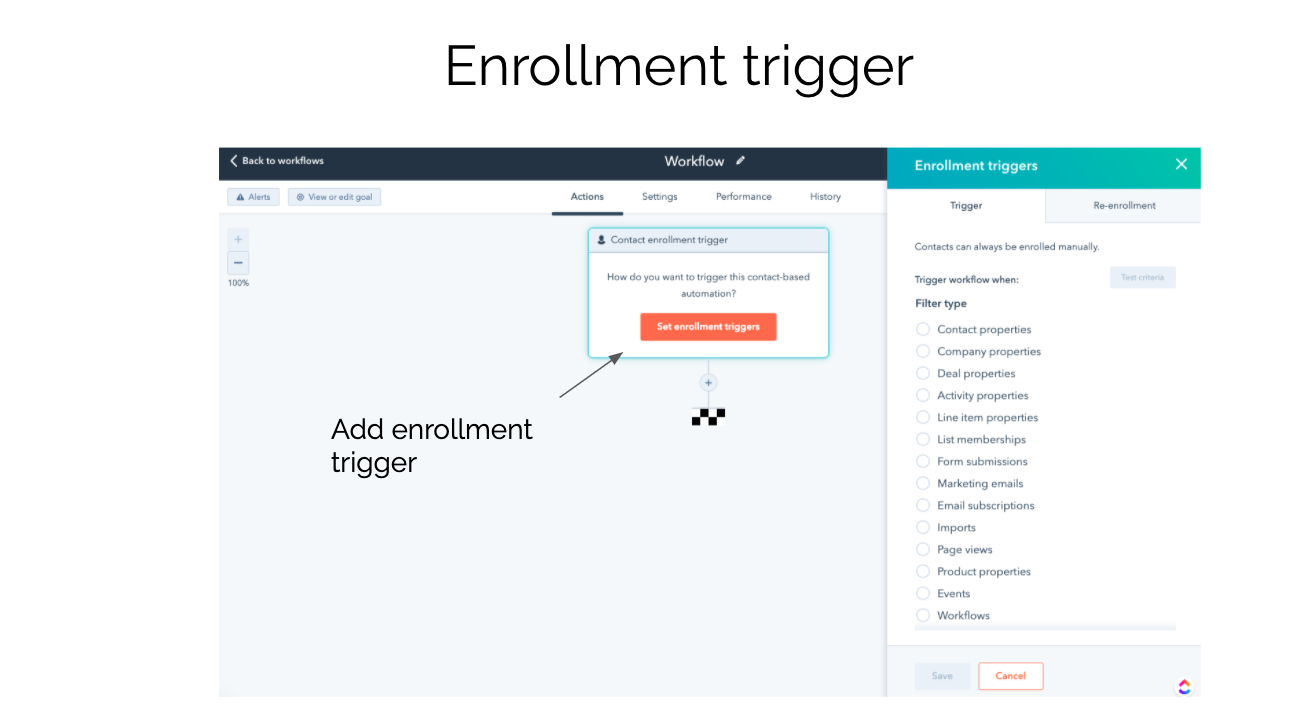
Add trigger to workflow:
- Start in the workflow editor, click Set enrollment triggers. Once your workflow has been created, set the enrollment criteria. When a record meets this criteria, they'll automatically be enrolled.
- In the right panel, select a filter type for your enrollment trigger. Set up the criteria, then click Apply filter.
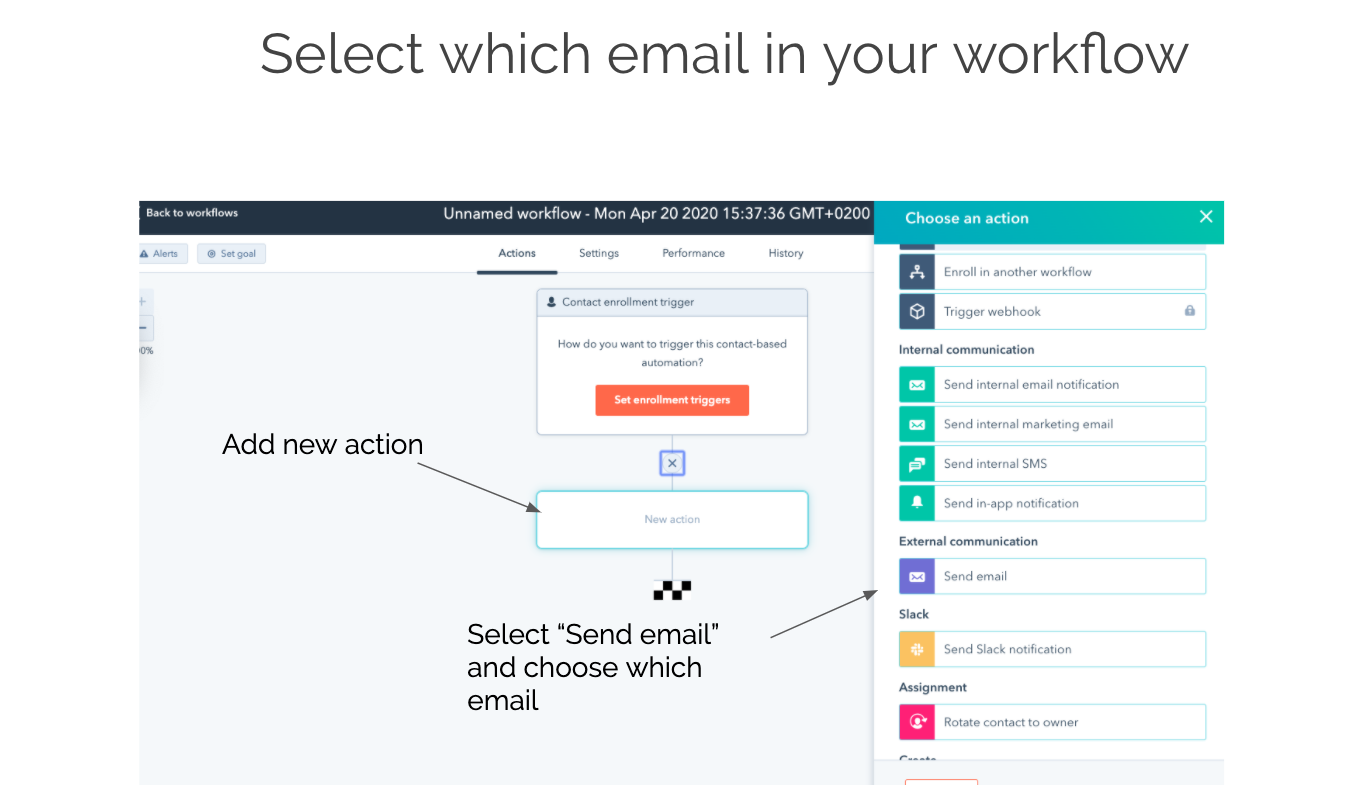
Add action to workflow:
- Click the plus icon + to add a workflow action.
- In the right panel, select an action.
- To insert the emails you created you add them as actions to your workflow. In the right panel with actions you select Send email. After that you will see all the emails you have created, choose one as a new action.
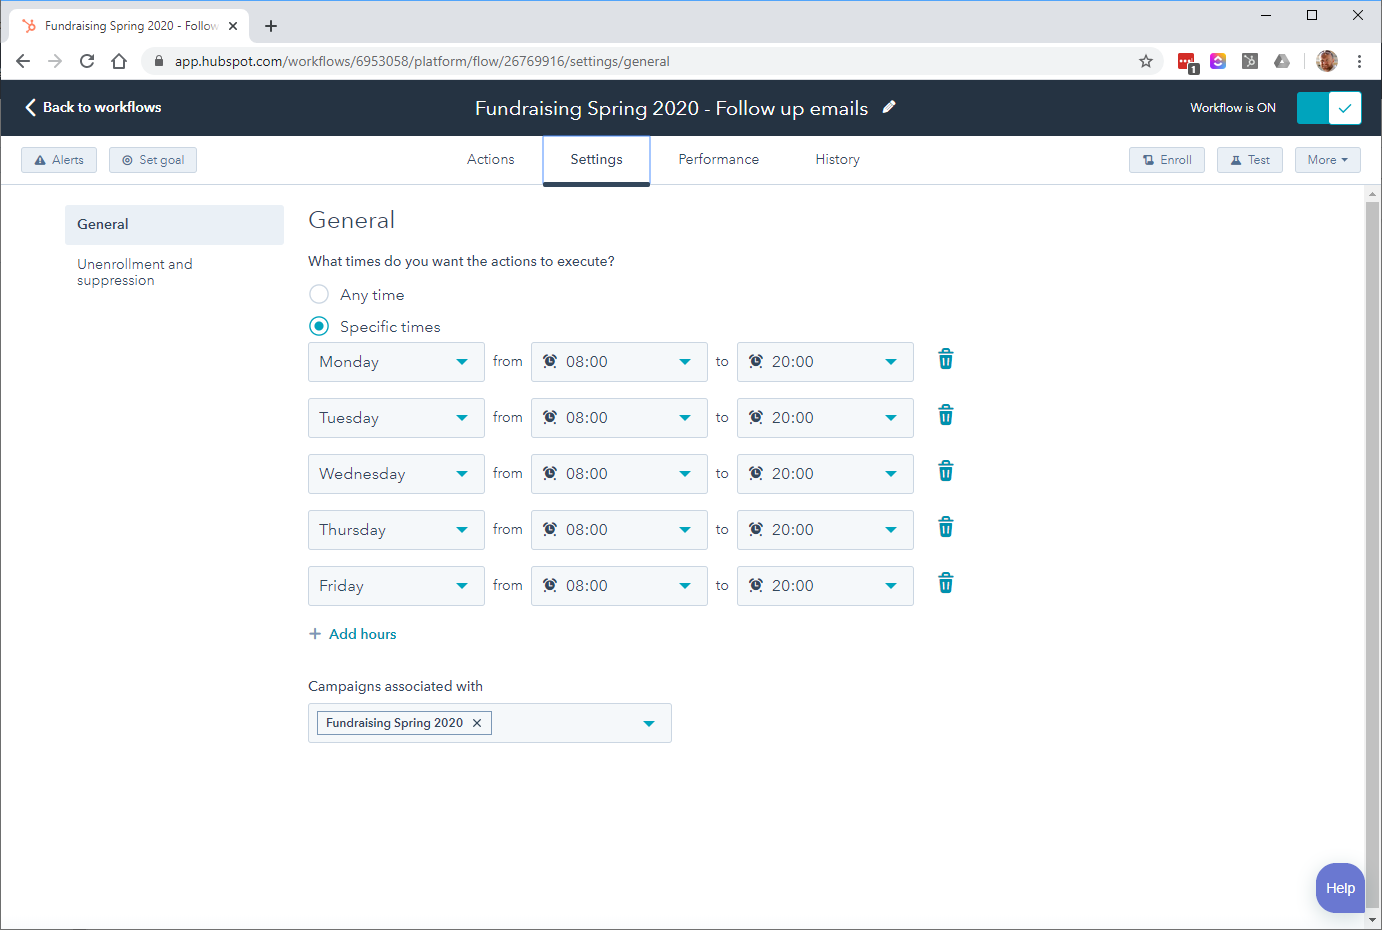
When creating workflows it´s possible to set up rules that decides when to send out an email in a specific given time when people are most likely to open the email. In the picture above you can see that the actions will exicute on day time between 08:00 AM - 20:00 PM. The idea of the given time is to reach both people who work early at the morning and those who work late.
“Approaching sales in a structured and organised manner is key to success. Coupler has given us tools where we easily combined our personal efforts with automations. This combination of marketing and CRM proved to be both easy to use and efficient” continues Thomas Nygaard CEO of NorQuant.